
OH, THE PLACES WE’LL GO!
Greetings! To my sister Bible class teachers,
Oh YES, the places the BIBLE will take us!
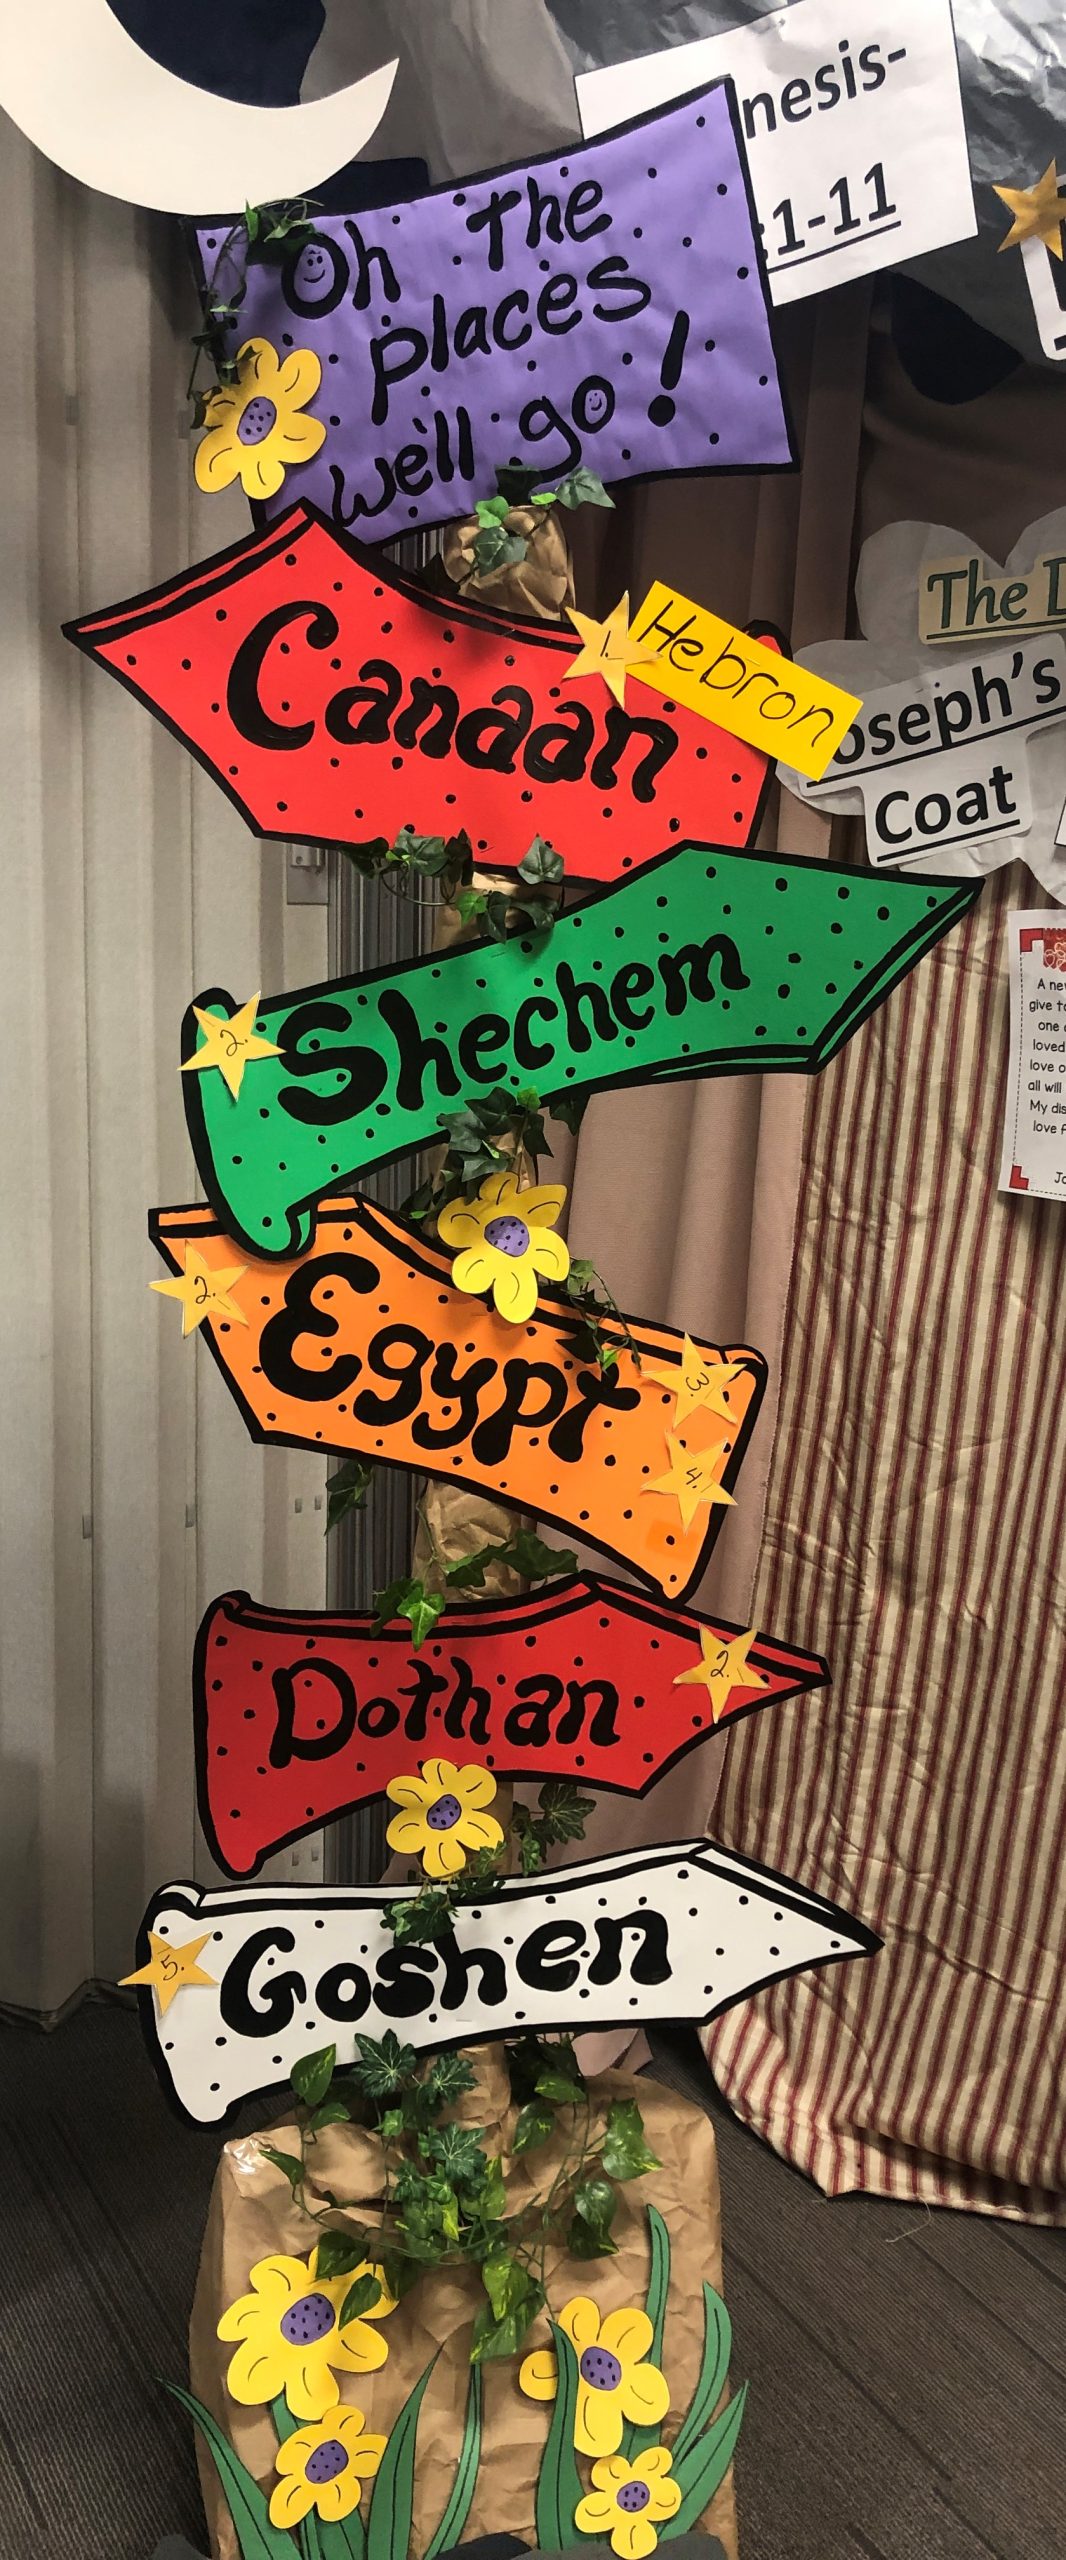
This past 5-day Vacation Bible School, we embarked on travels in Genesis 37; 39-50 with Joseph, the son of Jacob/Israel. With grades 4-5, I use a map every chance I get! They love to locate the places talked about within our lessons. So, we had a nice, highlighted map with stars and numbers on the stars for each day.

I also decided it would be fun to have a signpost with colorful signs pointing different directions with the names of the Bible places we would visit painted on each sign.
I must say, it worked wonderfully, and I could move it each day to a new scene around the room along with the map, adding a star to each sign of the place we traveled to that particular day. I also added a number on the star which stood for the day (1-5) we visited that place. The signs came in handy for a review as well!
This idea would also work well for your regular Bible class travels!
This signpost could even be used as a welcome sign with your students’ names attached,
using a different shape instead of arrows!
One more idea, would be to have the titles of your lessons on the post!
Add a star next to each lesson you cover!
See Supplies and Directions on how to make your own portable signpost below!
For the Arrow Signs you will need: (Steps 1-5)
- Colored poster board for your signs. (I used a few different colors that I thought went well with the black lettering.)
- Pencil to draw arrows and print the name of each location on the arrows. (If you choose to use Black adhesive letters you will not need to print out the name of each location onto to each sign. I do however like the whimsy of the print.) Before adding words to signs, think about which way you want your arrows to point and the sequence you want the colors of signs and names of locations on the post. (I did not want 2 red signs right next to each other and I added our first location we were visiting to the top position on the post, and second location below the first and so on. I do wish I had paid better attention for my Goshen sign is pointing the same direction as Dothan.)
- Black glossy acrylic paint to paint over the name of each location written in pencil, to make dots, and to highlight the edges of each sign.
- Paint brushes size medium and small. (I used the medium size brush to paint over the letters and the small brush to make the dots.)
- A flat area for the signs to dry overnight.
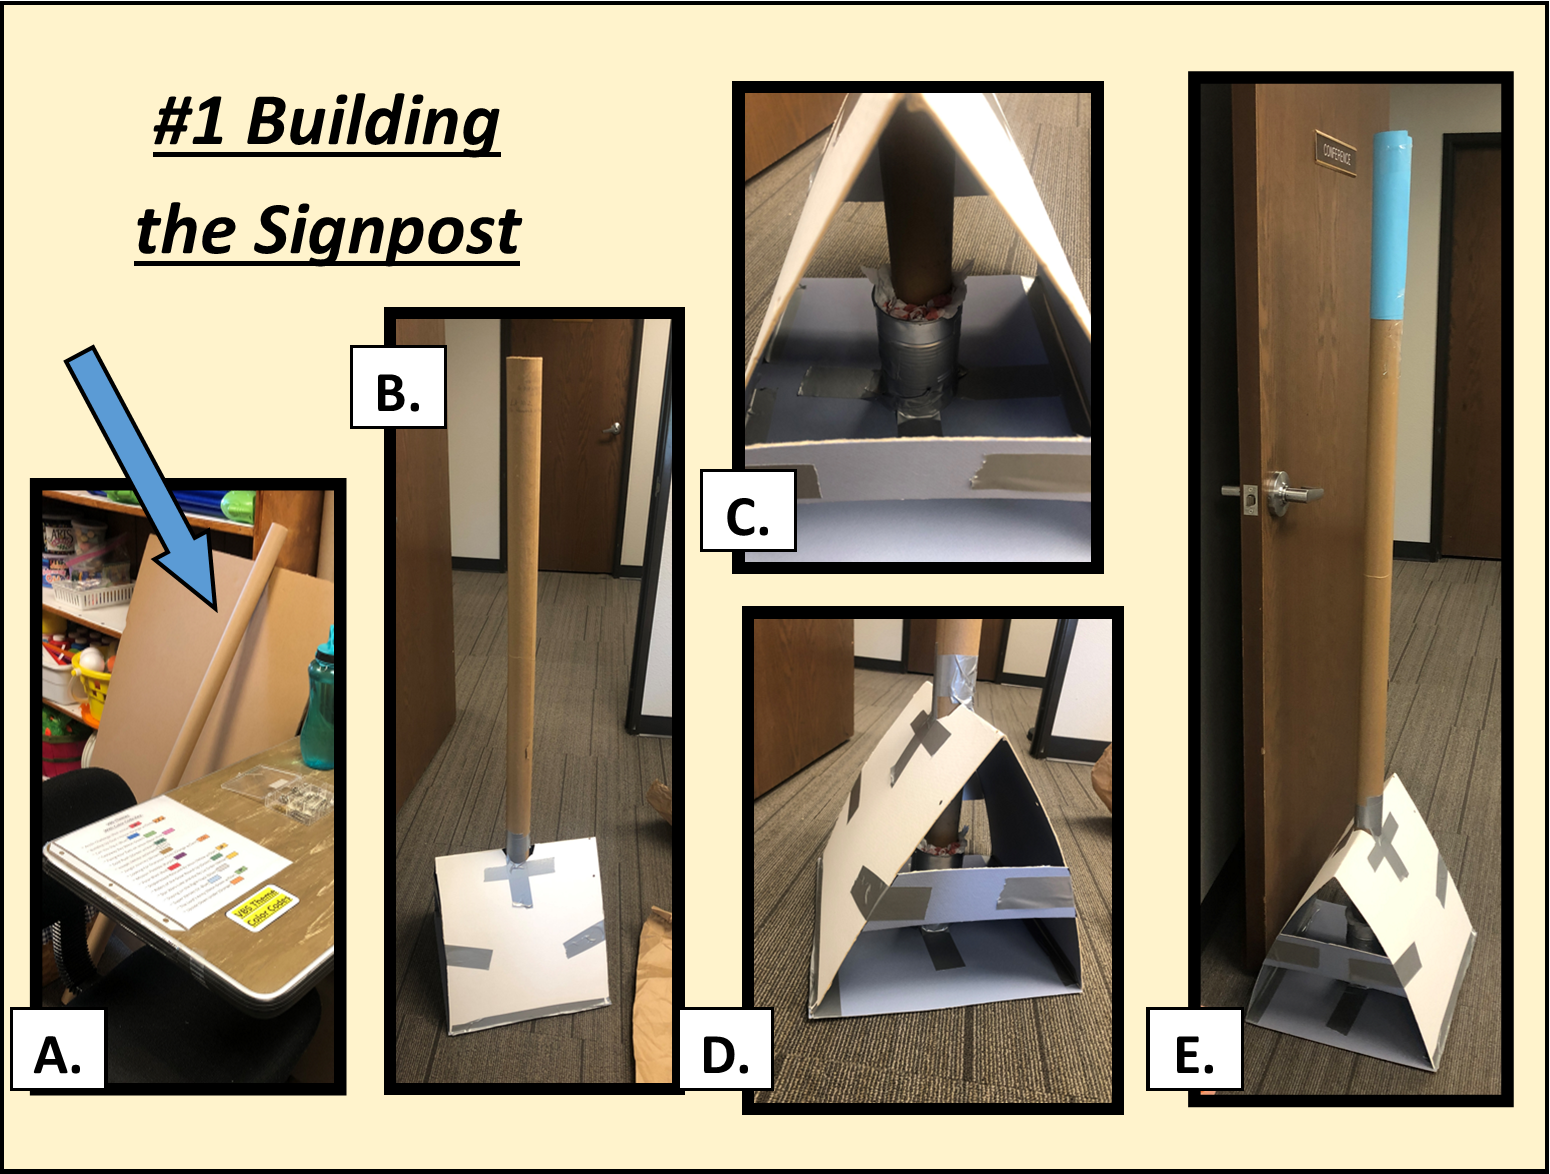
For the Sign Post you will need: (Steps 1-14)
See Photos below:
Set #1- Building the Signpost
Set #2- Covering the Signpost
Set- #3 Title Sign – Top of Post
* Optional
- Heavy tape, clear packing tape, scotch tape, scissors, regular stapler, regular glue. (I used Duct Tape for my heavy tape.)
- A tall tube of sorts for signpost. I used a long upholstery tube, about 5 foot tall from a fabric shop. It was sturdy and just about as tall as I needed it to be. You could use 2 or 3 rolls from wrapping paper and tape the ends together, then add a wrap over the area(s) you taped together so the pieces will be sturdy and not bend. (PCV pipe would also work really well. Use any kind of a tube/pole to become your post, you just don’t want it to weigh too much so you can move it easily.) See Photos, Set #1 – A.
- *1 piece of card stock to tape onto the end of the pole if you need the post to be taller. (A roll from paper towels would work just as well if not better, I just used what I had on hand.) See Photos, Set #1 – E.
- Cardboard for base. I used a piece of cardboard a little over 1 foot wide, and about 3 feet long, plus a little extra to make strips to tape onto the sides so it would be sturdier, (add strips after step 5). Once you have this base cut out, fold it into 3 equal sections and tape ends together with heavy tape, (it should resemble a triangle). Cut a hole in the top center of the base triangle just large enough for the post to fit through, See Photos, Set #1 – B and E.
- A clean tin can like from green beans, whatever can you use, just make sure the post fits inside the can without a lot of extra space around the pole and that the can fits inside the triangular base. Put can inside base. Insert post into the hole you cut in the top of the base, then insert the post into the can. Arrange the can so it sits in the middle of the base, so the post stands straight. Use heavy tape and tape can to the center bottom of the base. This is to make the pole and can stand sturdy and not slip around. Also tape the post at the opening in top of base, See Photos, Set #1 – C and D.
- Plastic disposable shopping bags, (the kind you get from a grocery store). Once the pole is inserted into the can, stuff these down in between the pole and the can to again, make sure the pole stands straight and sturdy. (How much space you have between the can and the post will give you an idea of the number of bags you may need.) See Photos, Set #1 – C.
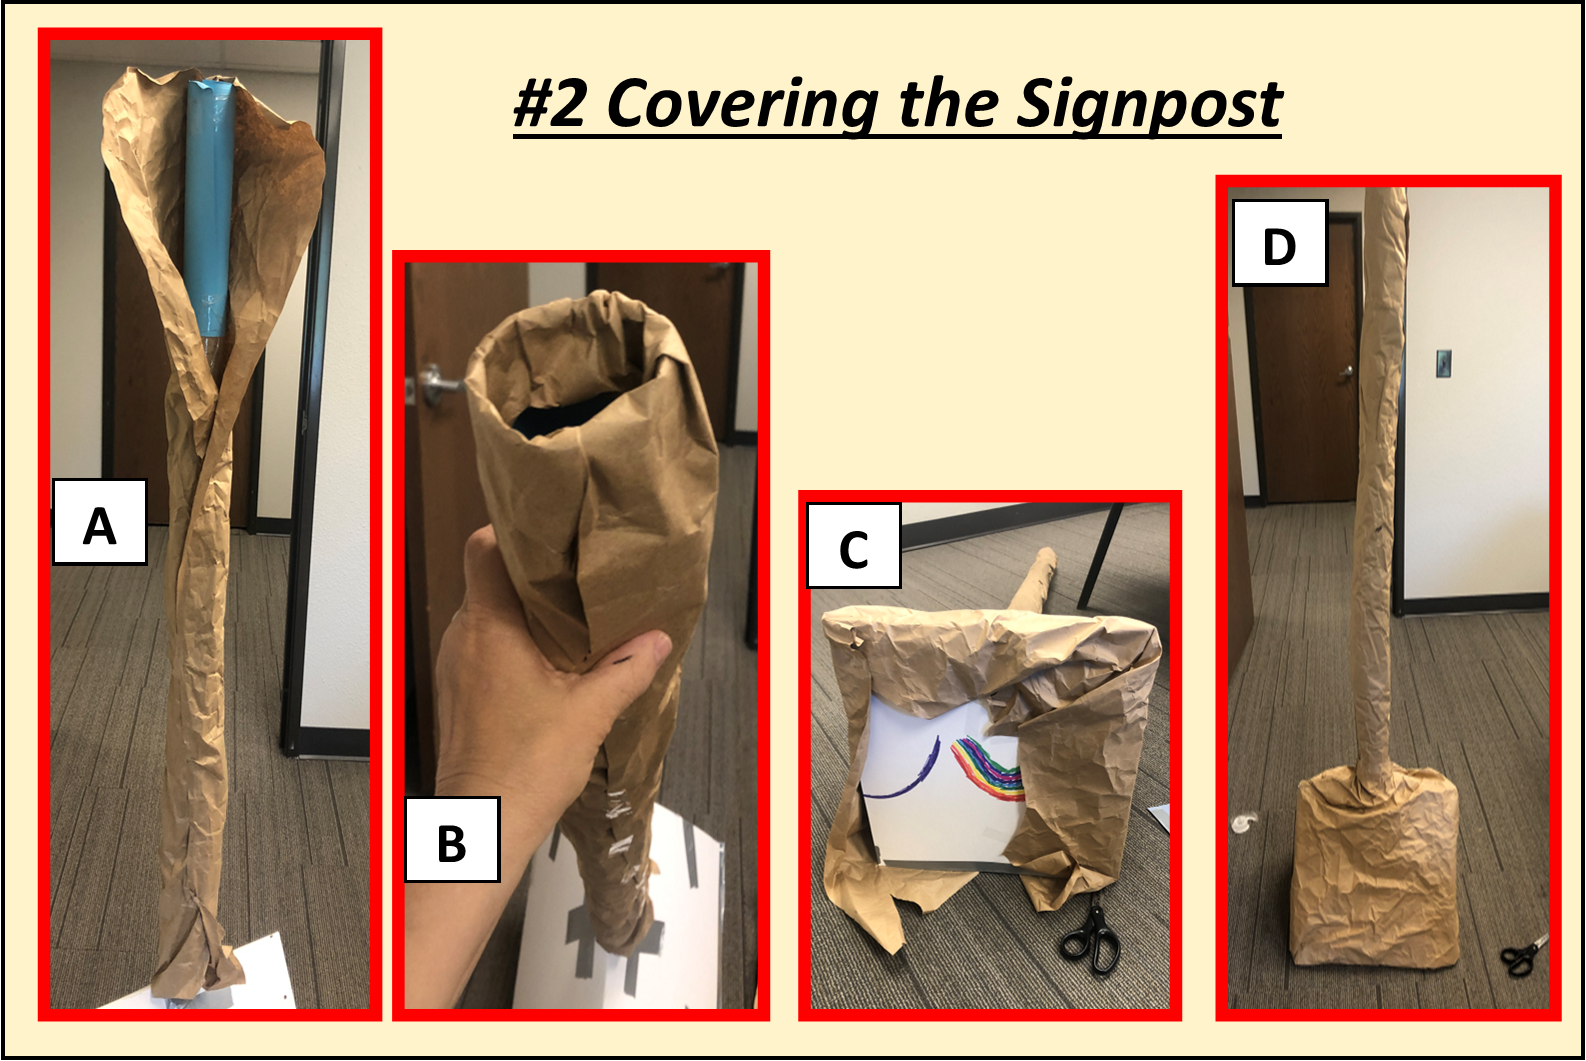
- Tan/brown bulletin board paper to completely cover post and base, See Photos, Set #2 – A – D. Cut paper to cover post and base and crumple paper up and then smooth it out to cover post and base taping into place with scotch tape. Crumpling the paper makes it easier to manage and fold around corners. Instead of covering the hole at the top of the post, I simply tucked the end of the paper into the post leaving the hole open for the title sign to be inserted later, See Photos, Set #2 – B.
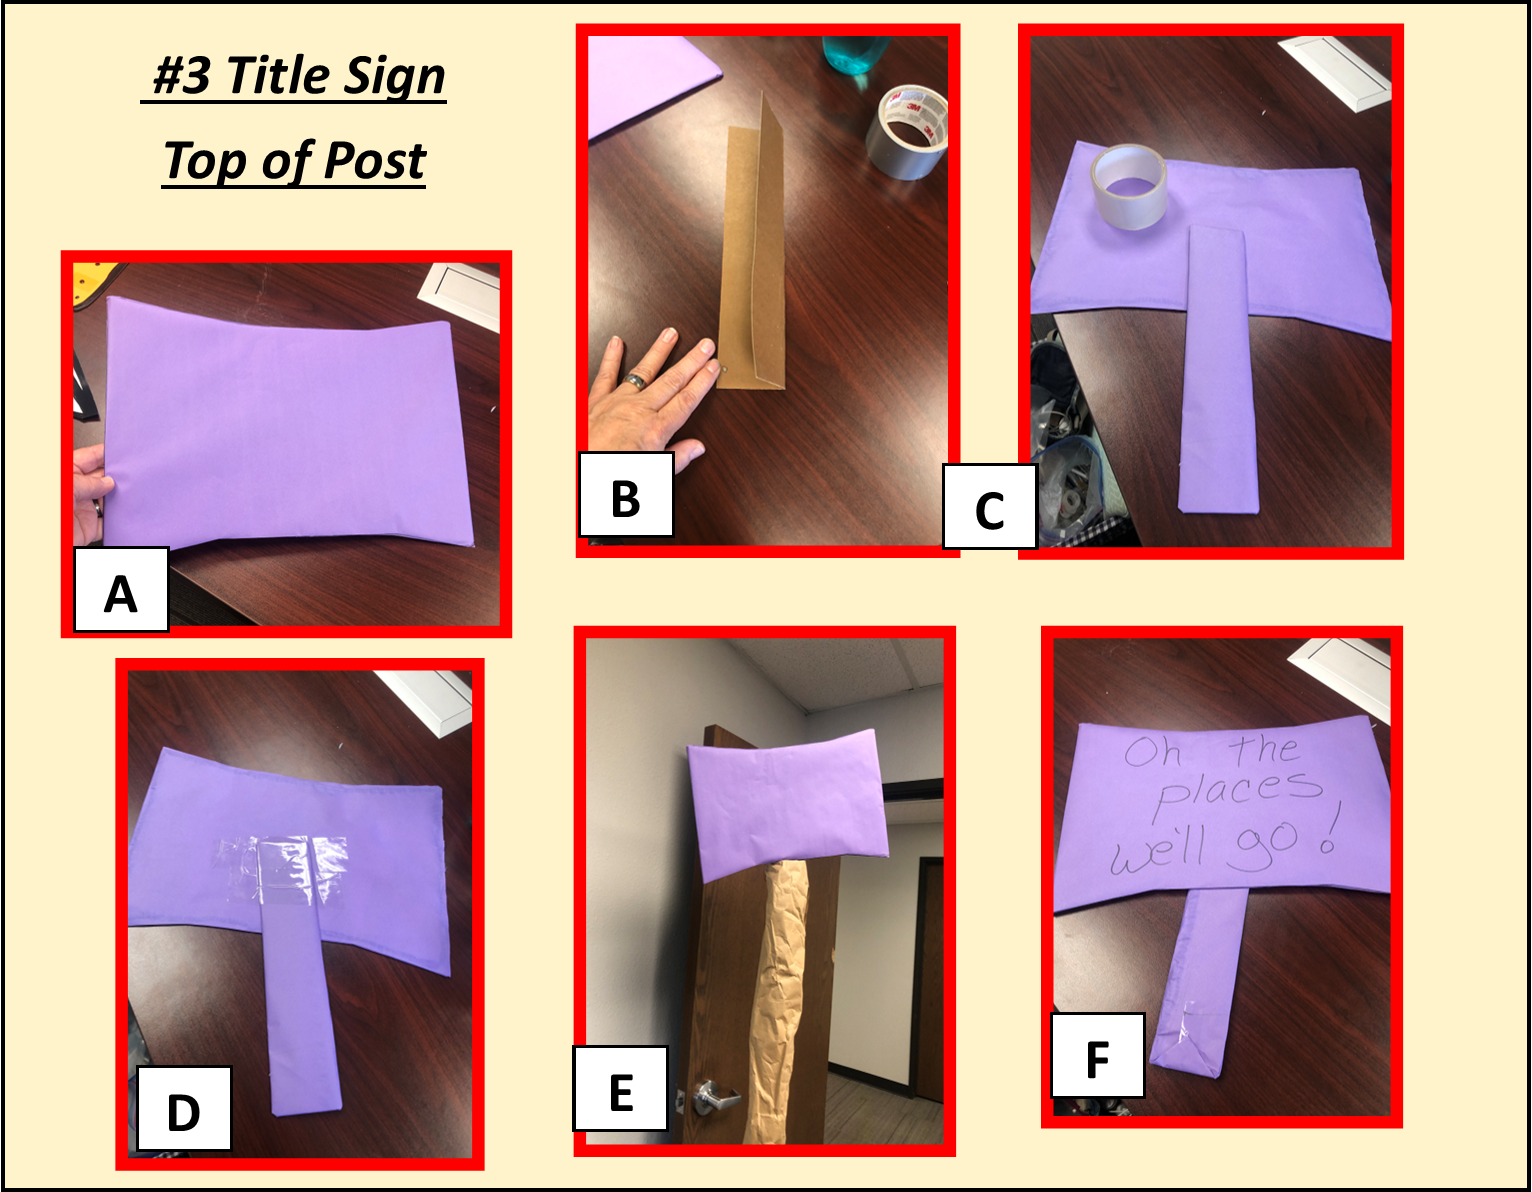
- Cardboard for title sign including the sign handle. Cut the title sign in whatever shape you wish to use. Cut out the handle for this cardboard as well. The handle needs to be long enough to go down into the top of the post hole to hold the title sign steady and keep it from falling out or over, See Photos, Set #3 – B Handle.
- Colored paper to cover title sign and handle. Lay title sign cardboard right side up onto colored paper and trace around it making the paper shape to cover the back of title sign. Cut out on traced lines and lay aside. Lay title sign cardboard right side down onto colored paper and cut paper to cover the title sign taping colored paper into place, (sort of like wrapping a package), See Photos, Set #3 – A. Add glue to back of the title sign and add the piece of paper you set aside to cover back of title sign, See Photos, Set #3 – C. Cover the sign handle with the colored paper as well, See Photos, Set #3 – C.
- Clear packing tape to attach handle to back of title sign. This tape holds big jobs and is perfect to hold the sign handle. (I angled my handle so my sign would be tilted on the post.) See Photos, Set #3 – C – D. Notice in photo C and D, the raw edges of the handle wrap are hidden as you look at the back of the sign. The raw edges are facing the back of the sign. This gives a nice neat looking back of the sign. The raw edges on bottom of the handle, Photo F, will be hidden down in the top of the pole, Photo E.
- Pencil to draw letters onto your sign, “Oh, the places we’ll go!”, See Photos, Set #3 – F. Paint over drawn letters or use black adhesive letters. Add black dots with paint. Once the paint is dry, insert handle into top of post.
- Stapler to attach each sign to the post.
- * Vines and Flowers. I stapled a plastic vine with leaves around the post and added paper flowers and grass made from construction paper and mounted them with rolled scotch tape. (Plastic flowers would work just fine, though I do like the look of these paper flowers.)
- Enjoy using your portable post!!
 Thank you for stopping by and feel free to leave a question or comment below!
Gwen

She is known to many as “Miss Gwen”.
She enjoys opening the Word of God with various ages, but children are one of her all-time favorites. Gwen has had the pleasure of putting the Word into the hearts of children for over 40 years and loves it still!
Gwen has been married to her preacher man Dan for over 45 years and knows the blessing of children with loving spouses and 5 sweet grandchildren who made her into Grandma & Nina.
Gwen is the author of the book, Mary Rose & Me Learn Bible Truths Together!
Mary Rose will help you love God, others, and yourself!
Check it out at the link below!
https://www.amazon.com/Mary-Rose-Me-Truths-Together/dp/1943245150
- Perk Up Your Kids’ Bible Class with Crowns, Hearts & Scrolls! - March 18, 2026
- Perk Up Your Kids’ Bible Class by Talking About the Bible Books! - August 21, 2024
- Perk Up Your Kids’ Bible Class with a Sweet Method for Resource Madness! - July 18, 2024
 Welcome! We are so glad you stopped by. Come Fill Your Cup is a group of Christian ladies dedicated to equipping women for study and service. We know you are busy and that life’s hectic pace pulls you in so many directions, but you can’t truly be the woman God desires unless you take time to fill your own cup…not with spa days (though we love a good spa!) or the latest novel…but with God’s Holy Word. We want to help you with that! Our goal is to reach you in the midst of your busy day and give you encouragement, education, and fellowship as you strive to live the life God has laid before you. Our prayer is that we can help fill your cup so that you, in turn, can overflow to all those around you. So, as we like to say…come fill your cup, and let it overflow!
Leave a Reply