
Greetings! To my sister Bible class teachers!
Don’t you love a great resource room?
It’s great to want to perk up our Bible class walls and tables with teaching pictures and hands on items, but unless we know where to pinpoint the location of specific items within our resource/storage room, it’s easier said than done.
In the past, we had a work room lady who could help us with supplies and find whatever teaching helps we needed but if she wasn’t available, we had to dig around to try and find what we needed only to discover we should have been looking in the opposite corner of the room!
What we needed was a timesaving method that any teacher could use whether the “workroom lady” was there or not.
This month
I’m excited to share a method to this resource room madness with some ideas to help you find, use and return teaching helps that are ready for use within your resource room and how to keep track of who has what materials!
Introductory Stage:
It’s best to have 2 – 3 people who have been/are experienced teachers because they think like a Bible teacher and basically know the basic needs of a Bible teacher. They must have willing hearts, be able to work together, and have a bit of organizational skill to be in charge of maintaining this room and kindly helping others when needed.
Have you heard of the “Home Edit” show? If not, it’s worth a look.
I like this show because they are experts at what they do and actually show you how to organize!
This method is adaptable to any space!
There are 4 steps that is the method to their madness. Edit, Categorize, Contain, and Maintain.
Step 1 – Edit!
Quote from the “Home Edit”:
The “edit” portion is first – it’s what sets the foundation for any space that’s transitioning into a more organized one.
The idea behind editing is sorting your inventory and keeping what is good and useful and getting rid of items/visuals that are outdated or in poor condition. If you like an idea of something that has been torn or is in bad shape, take a picture of it so you can make a new updated version and pitch the old one.
The best way to begin your edit is by taking all of your inventory out of the room, (visual aids, handwork/activity pages, posters, books, hands on items, props, maps, paper, office supplies, zip locks, hot glue, Accucut machine with die cuts, laminator, paint/paint brushes. crafts, bulletin board boarder, sets of Bible class teacher/students’ books etc.) and anything else you may find. We used one of our hallways to temporarily stack all of these resources as we went through them.
We cannot save everything!
When it comes to editing, depending on how much space you have for storage, sometimes you must go even further and actually make sacrifices of good things. For example, you may have ten flip charts of the same lesson when in reality you only need five.
Be willing to let go of some things.
There may be a Bible teacher from across the miles that you have connections with who could use this overflow, a sister congregation, or missionaries or you may just have to recycle or pitch it.
We had old class materials such as teacher/student booklets that were piling up and had not been used in many years. We were able to pass them on to a missionary who put them to good use while freeing up coveted space within our resource room!
Also, take this opportunity to clean the room. Share the workload, get a small cleaning crew together so the edit team can do their job.
When we first began editing the blessing of our “stash” I was working with one other lady, and we found this room had actually become a CATCH-ALL for anything and everything! If someone did not know where to put something it landed in this room. No wonder we were so cramped on space and could not find what we needed.
This Edit process was something we needed very much!
Step 2 – Categorize
As you edit, you will need empty containers such as bins/boxes/laundry baskets to help categorize what you are keeping.
These containers will most likely not be the final storage for these items, but you will be able to categorize your piles much faster and easier as you edit. It may even help if you take some scrap paper and a marker and actually label these temporary containers, then everyone knows where to put what is being kept.
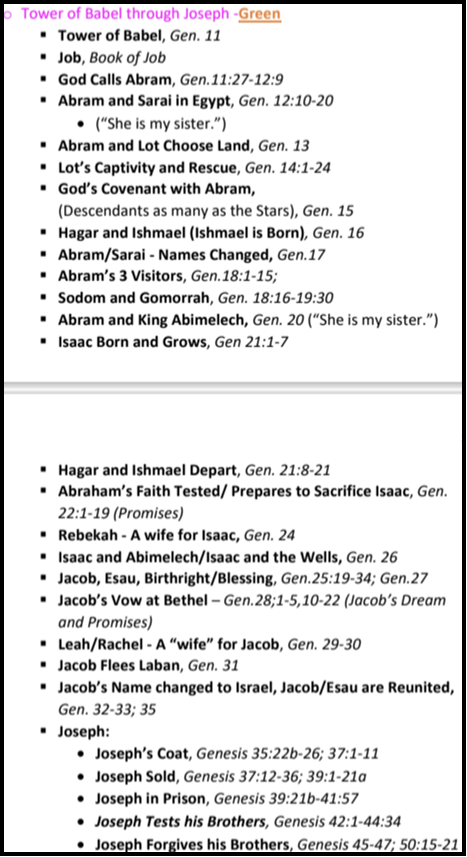
A tip for categorizing picture visual aids. Begin by having a separate bin for Old Testament and New Testament pictures. Next, categorize these pictures for specific lessons by separating Old Test. pictures with dividers into Bible lesson sections within the Old Test. bin such as Creation; Tower of Bable; Noah; Abraham, Jacob, Joseph, etc. Do the same for New Test. pictures.
When it comes to putting these lesson pictures in order, having a printed chronological list of Bible lessons is a great help.
Then give each of these picture Bible lesson sections a color code. This is how our “picture zone” categories are color coded, (*zones/sections are explained on down in Step 2).
Old Testament – Zone/Section – A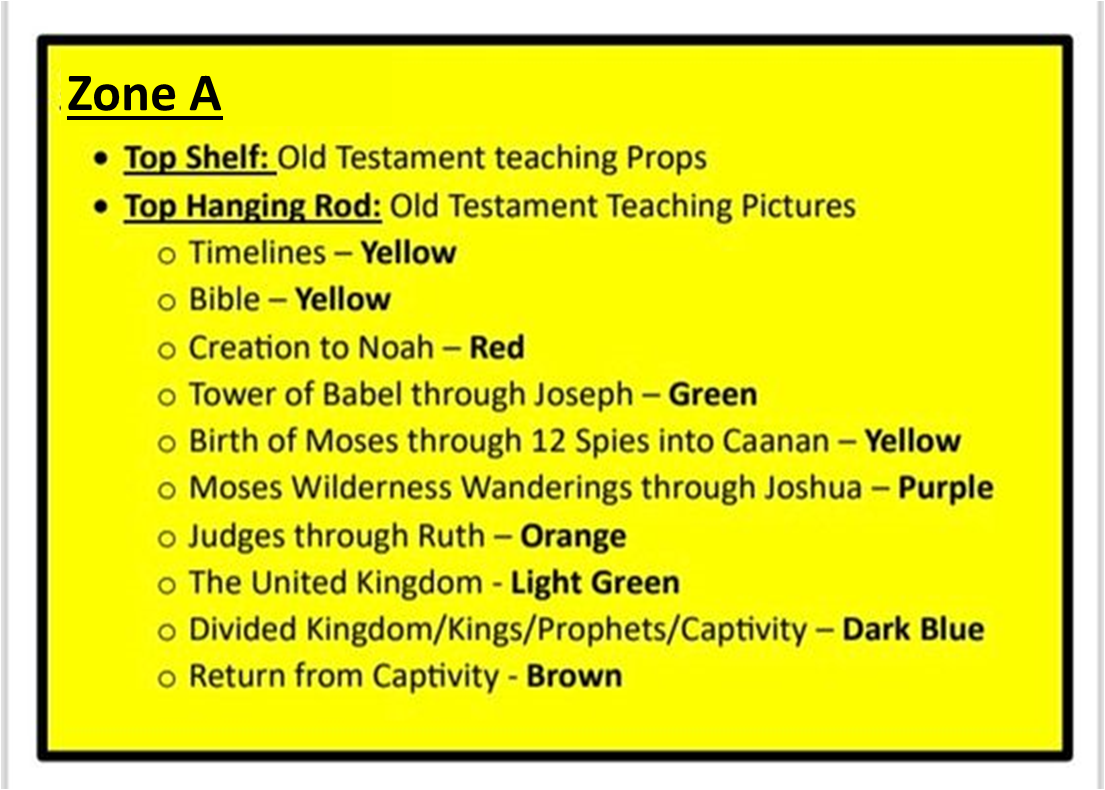
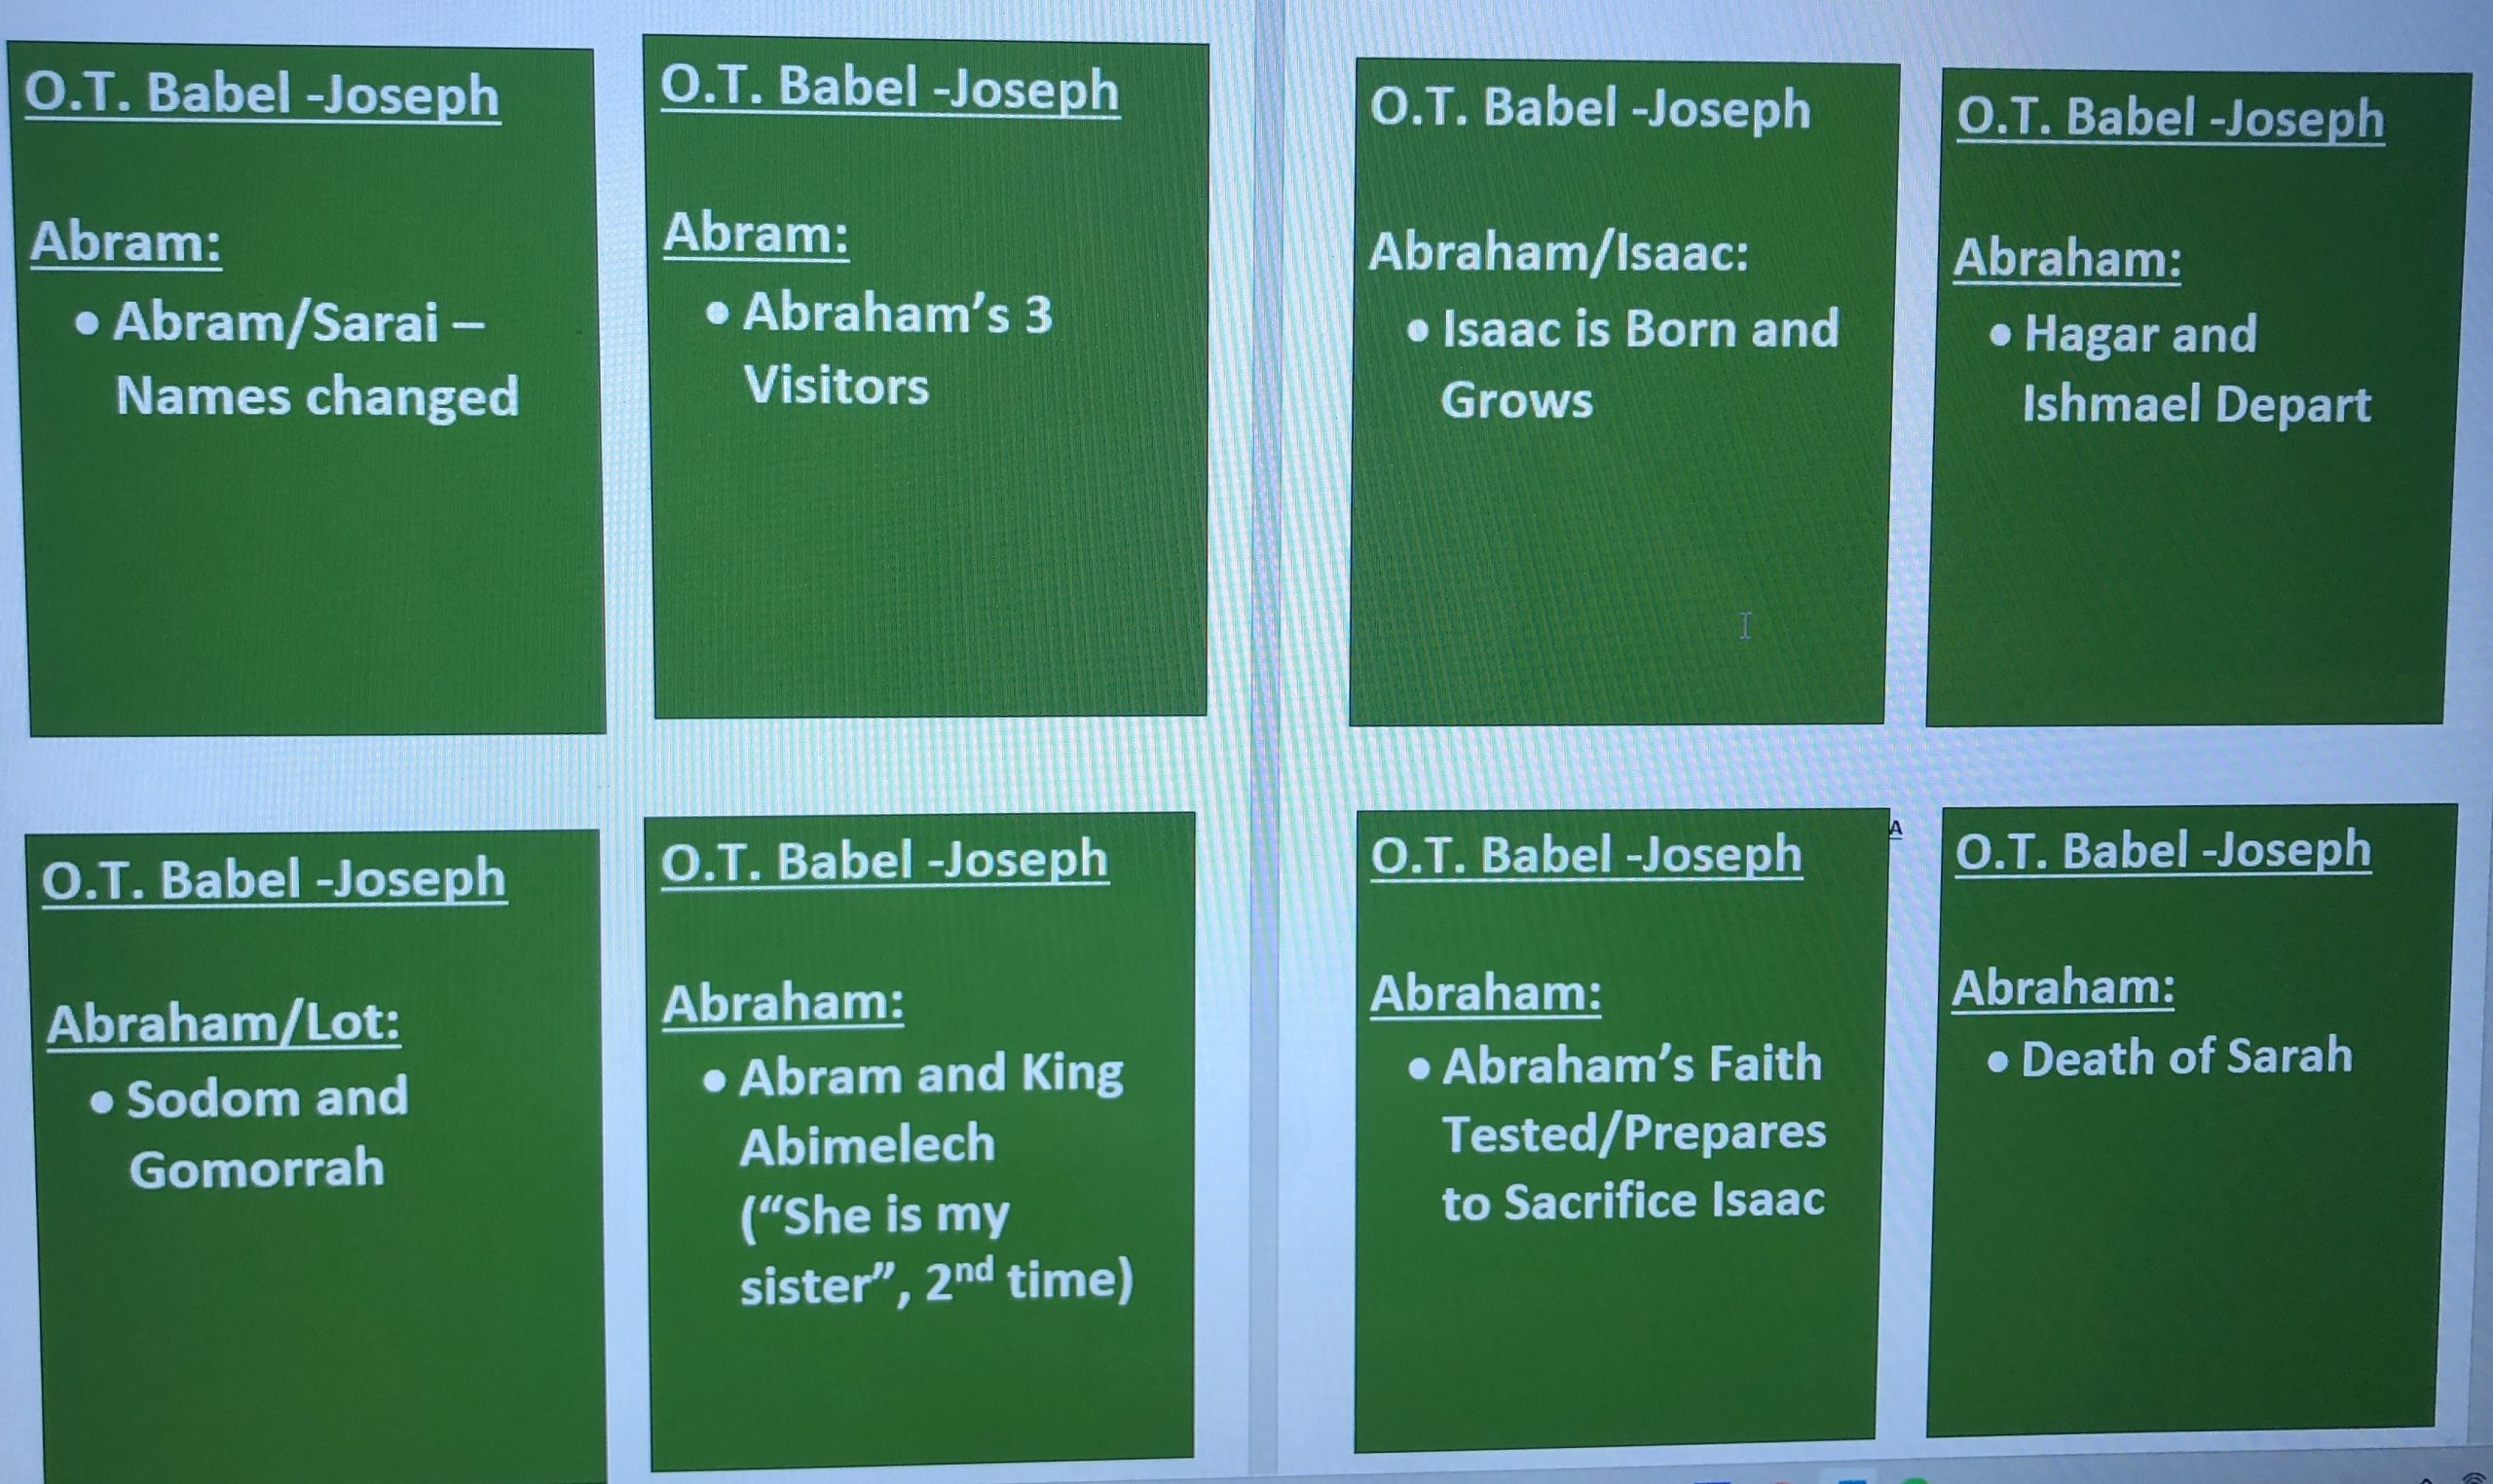
Each color category within this zone/section, has several pictures that are separated by Bible lesson, into their own clear hanging bag. E.g., The Tower of Bable pictures have their own bag and each of the listed lessons below, but they are all in the “Green” color code with a green label which is the Tower of Bable – Joseph. (**See more about these hanging bags in step 3 – Contain.)
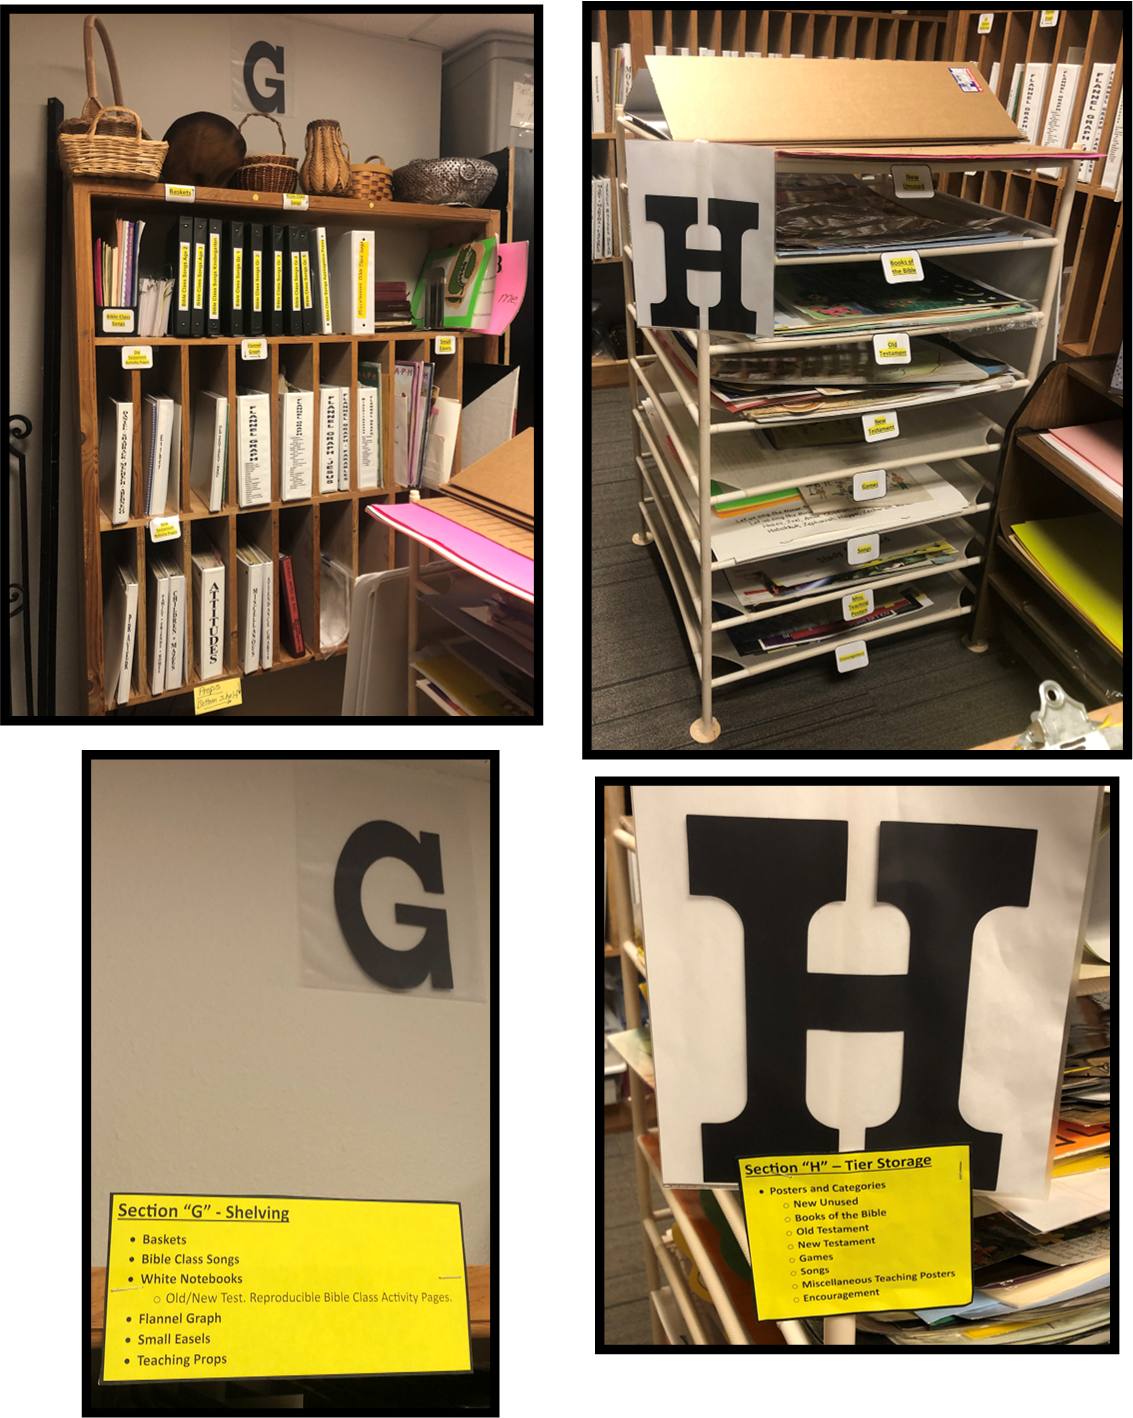
The categories we came up with for our posters are as follows:
- New Unused Posters
- Books of the Bible
- Old Testament
- New Testament
- Games
- Songs
- Miscellaneous Teaching Posters
- Encouragement
If you save Bible class teacher/student booklets, you will need to have an individual labeled bin for each brand of lesson books, e.g., put all the Shaping Hearts class materials in 1 or 2 bins.
Have a bin for office supplies, etc.
All this sorting needs to be done before step 3 of containing these items in their final storage.
This step 2 of categorizing will actually help you set up zones/sections within your resource room for each category.
*By zones/sections I mean – carving out a section of the resource room where particular items have a home within this space, such as a paper zone, office supply zone, craft supply zone, New/Old Testament Bible pictures zone, a poster board zone, Bible game zone, hands on zone, teacher help books zone, Bible prop zone, Bible map zone, Bible class songs zone, Aucutt and dye cut zone, laminating zone, etc.
We even have a zone/section for a few cleaning supplies we keep on hand especially for our resource rooms.
Having zones will help teachers easily function within this room. All the effort put into this type of organizing is so worth it when you see a teacher go into the room and come out with exactly what she was looking for in a short period of time. Yay!!
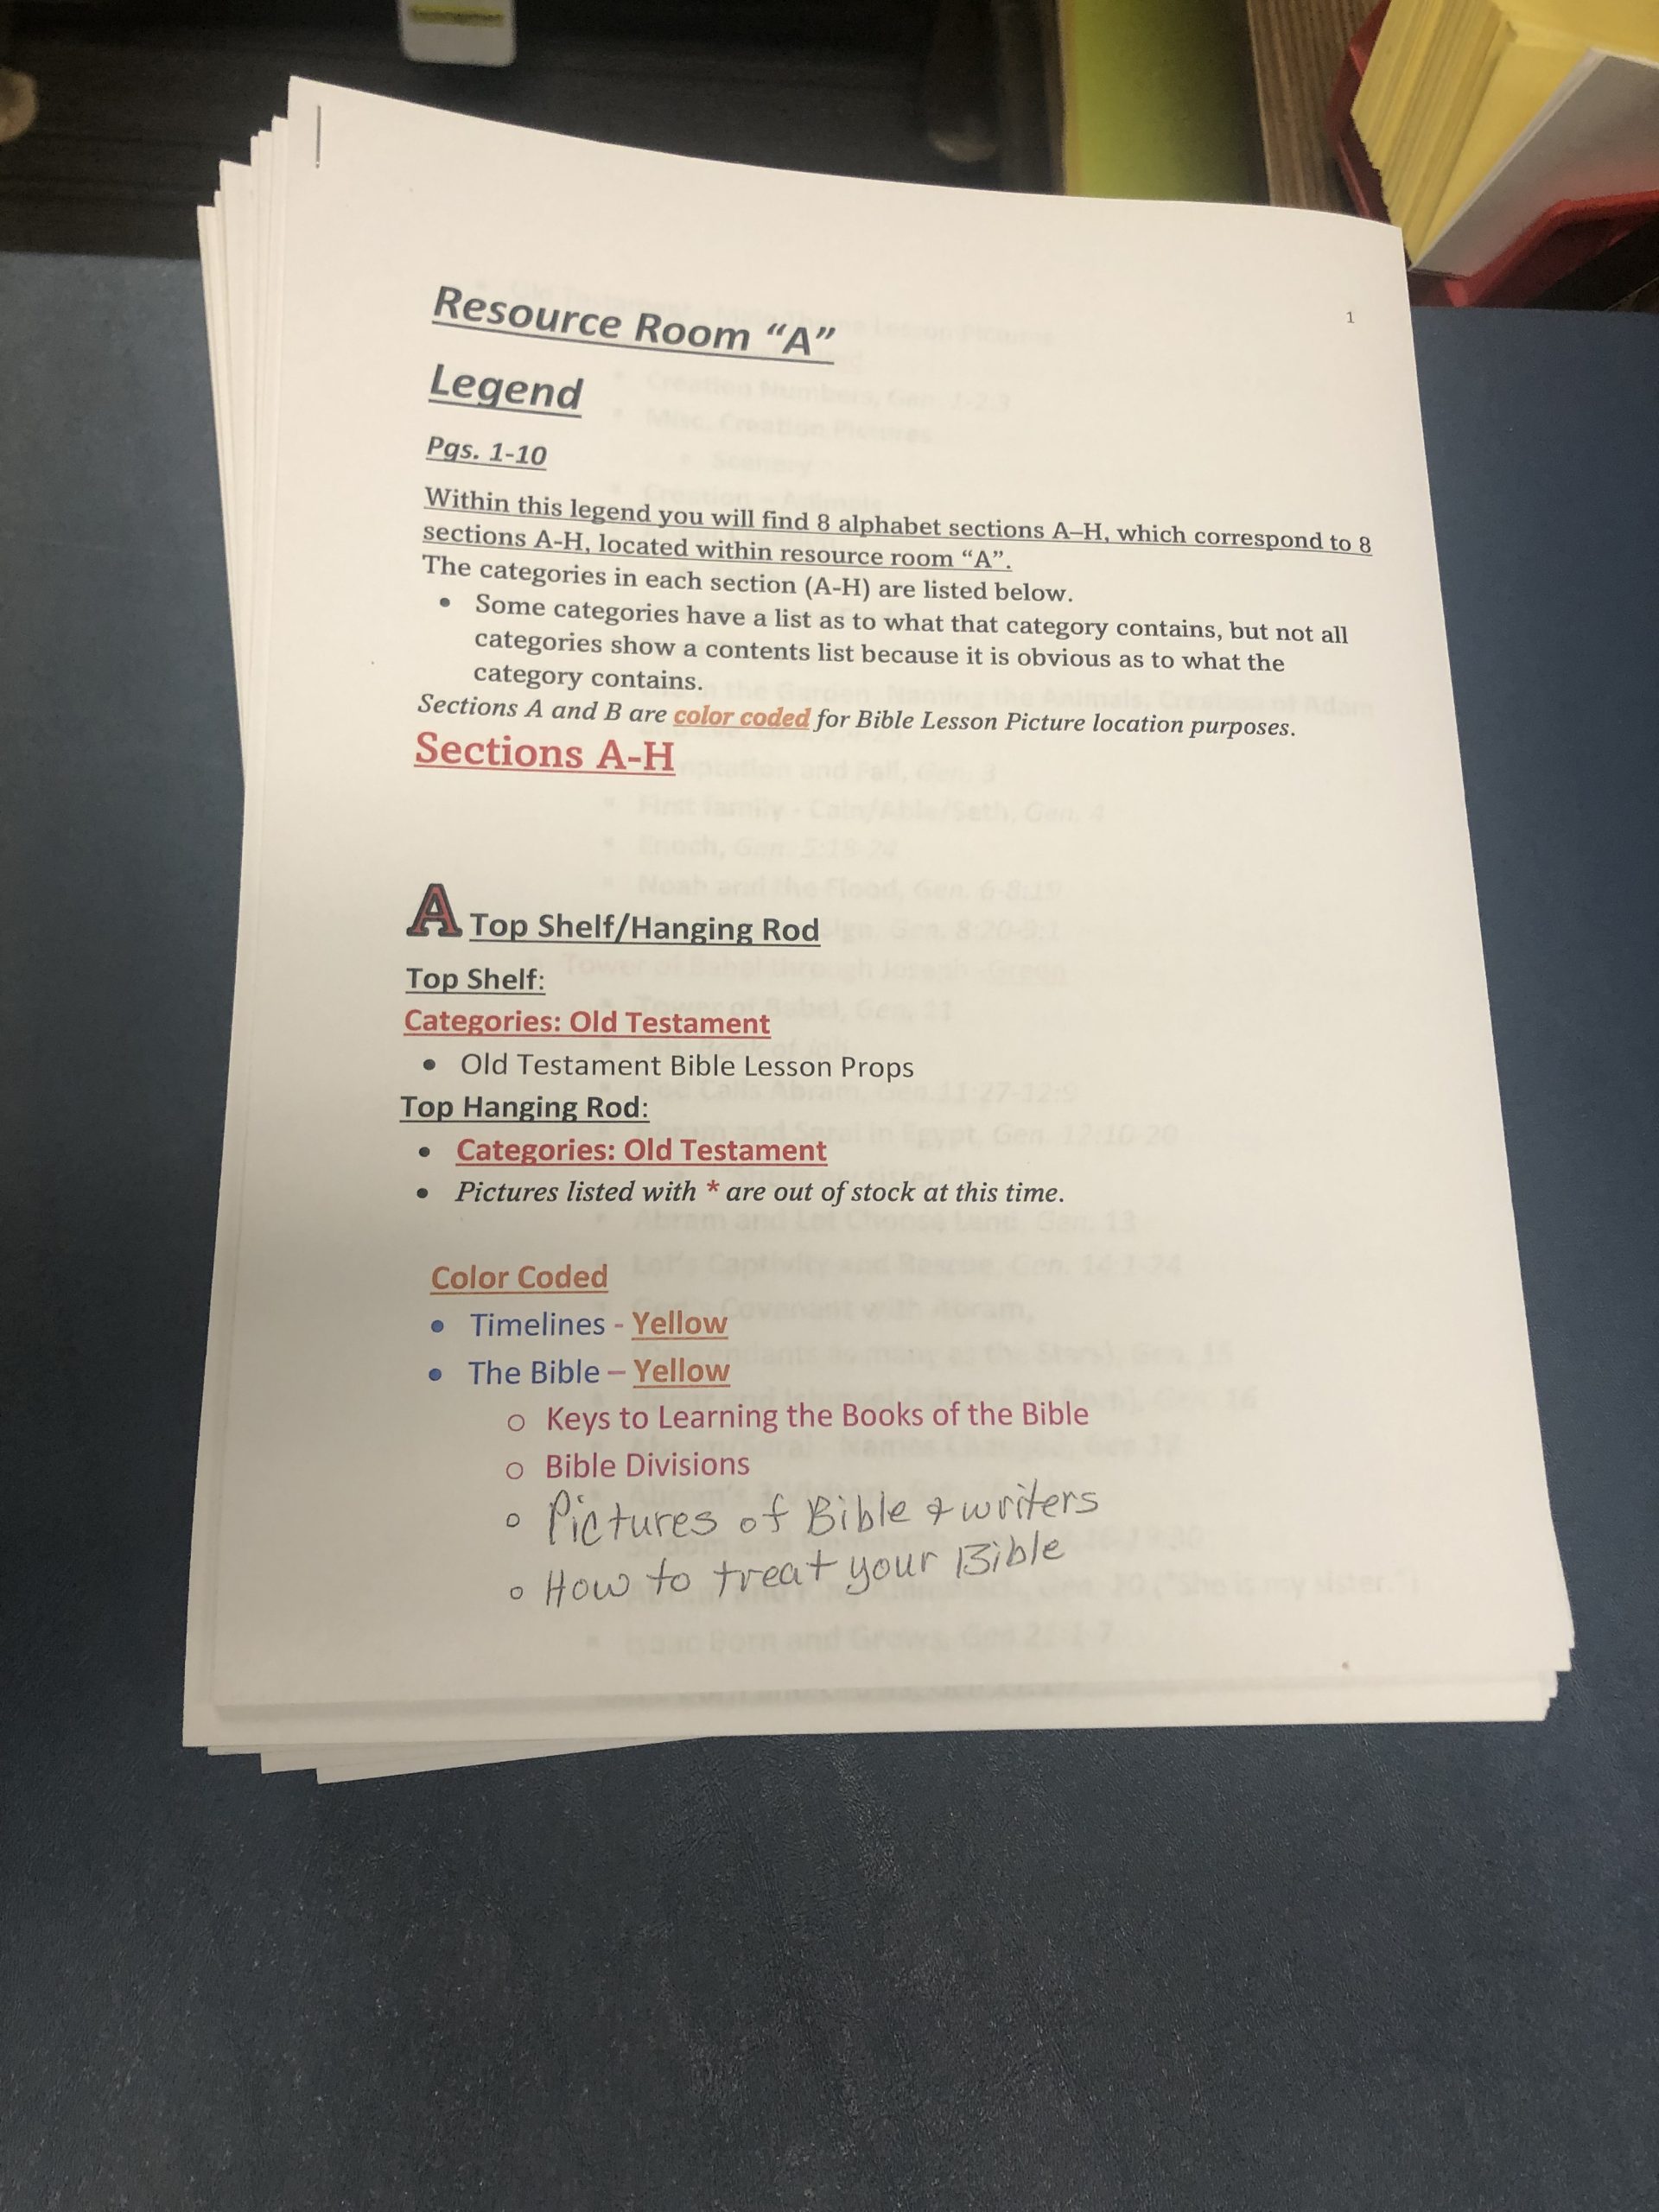
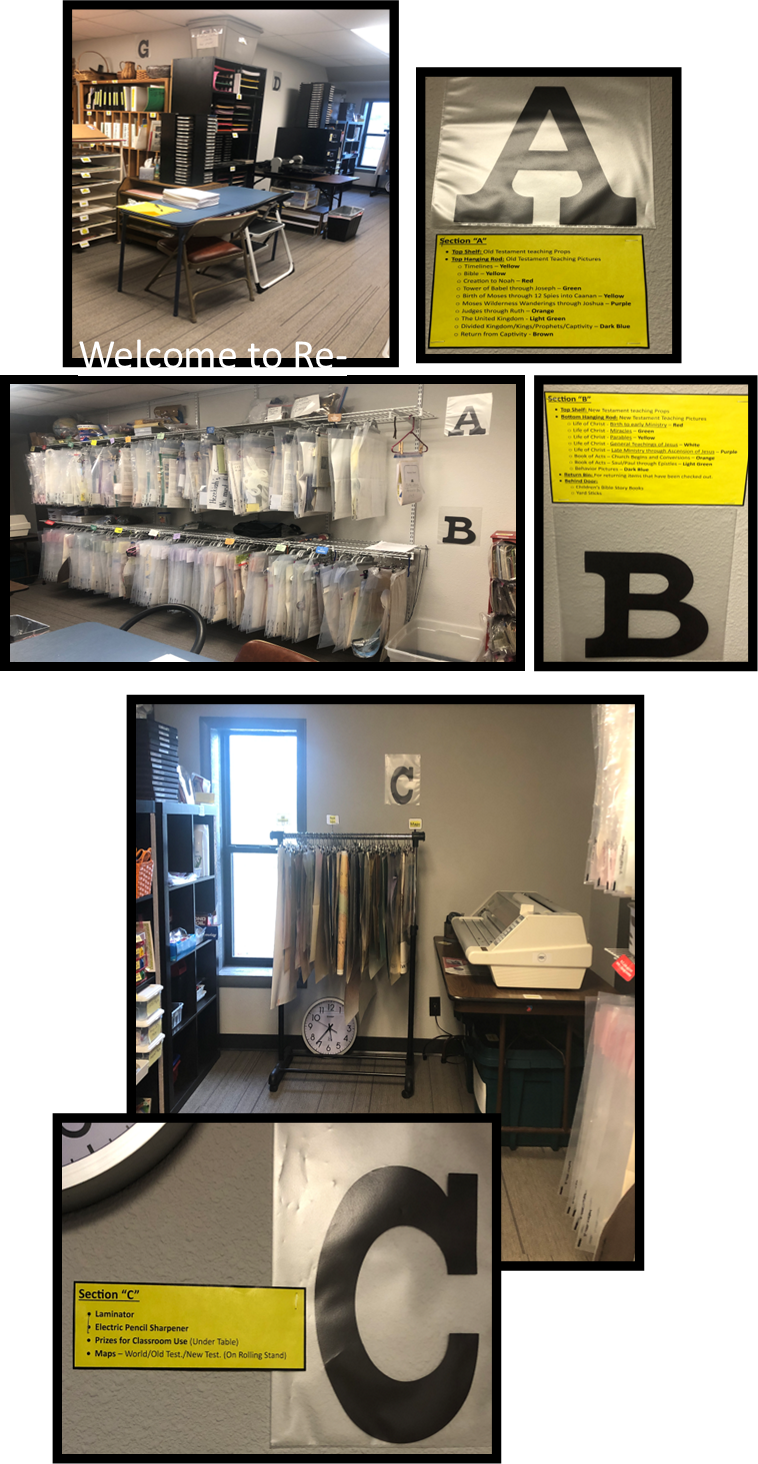
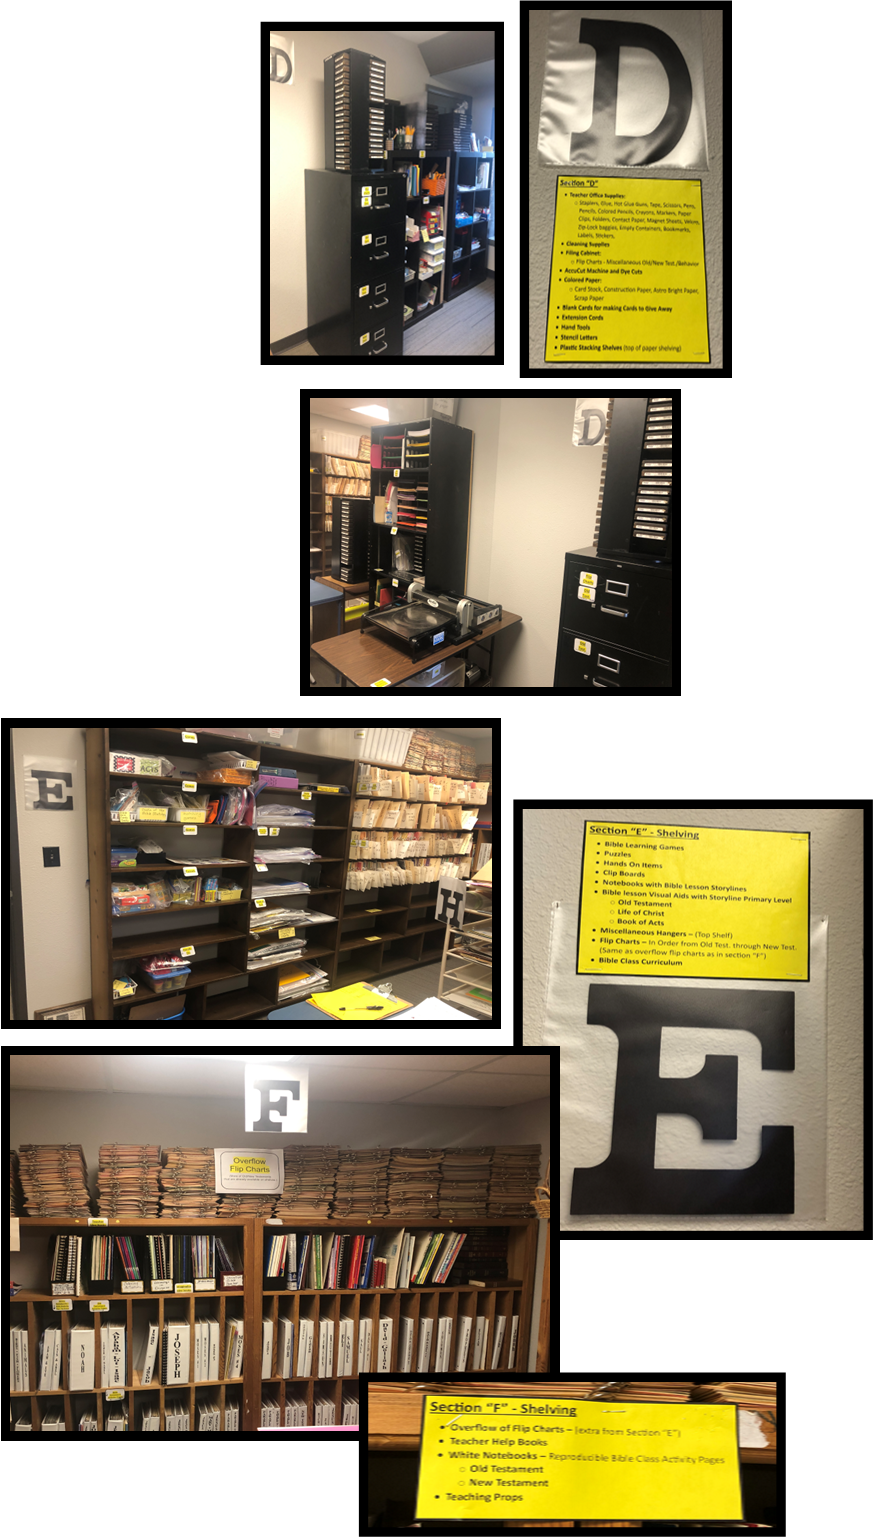
The zones in our teacher resource room are labeled and are set up with open shelving, bins with lids, etc. Each zone/section of the room has a large letter of the alphabet and a printed yellow paper beside it listing the categories within each particular zone of the room. (We actually have 2 resource rooms. One is mainly for VBS items, and the other is for regular Bible class resources, but both are organized in the same fashion.)
Step 3 – Contain
This step is about final containing and labeling of your inventory, so it is easy to locate!
Look at your space and your inventory. If you need to replace or add new shelving to your space or switch the furniture around now is the time, when everything is out of the room.
Having good storage is an investment in your Bible Resources and may take time to collect what is needed but it is worth the cost and effort. There are many containers out there these days that can help you properly contain the categories that will go into your zoned spaces. We try our best to stay away from cardboard for it attracts bugs. Many of our craft items that are on an open shelf are easily contained in Ziplock freezer baggies, so they stay clean, dry, and are easy to see.
Here is a short list of some containers that may be of help to you.
- Open shelving or cupboards with shelves is a must.
- A peg board on the wall may be handy.
- Large, medium, and small sizes of stackable plastic storage bins with lids. (Check out the dollar stores, thrift stores, Walmart, etc.)
- Holders for paper to stand upright or to lay flat depending on how much space you have.
- Holders for office supplies such as pencils, pens, crayons, tape, markers, brads, stickers, etc.
- A rolling hanger rod with hangers that grip to hang maps from is very helpful.
- 1-gallon and 2-gallon size zip lock baggies for much of our storage to keep items clean and dry. (We asked our congregation for donations of these baggies, and they were very generous.)
- Wall rod system for hanging clear bags to contain all your categories of Bible pictures. (Check with Home Depot/Lowes)
- We ordered our hanging bags from a place online called Monaco Hang-Ups.
- Poster board storage to stand upright or to lay flat. (We are actually using sweater racks for most our poster board categories.)
- Filing cabinets
- Table or counter space for Accucut machine with die cuts and laminator.
- It’s ideal to have a worktable for the teachers within the room, but not always necessary. We have a room next door to our resource rooms with a large table that is easily accessible.
- Return bin for items that have been checked out.
- Trash can Ha! Yes, even trash needs a place!
If your resource room is still overflowing and you have no more space, you may coordinate with the teachers of a certain age group to store some items for their age group, within their classroom to give them easy access to the materials and give a little more relief to your resource room.
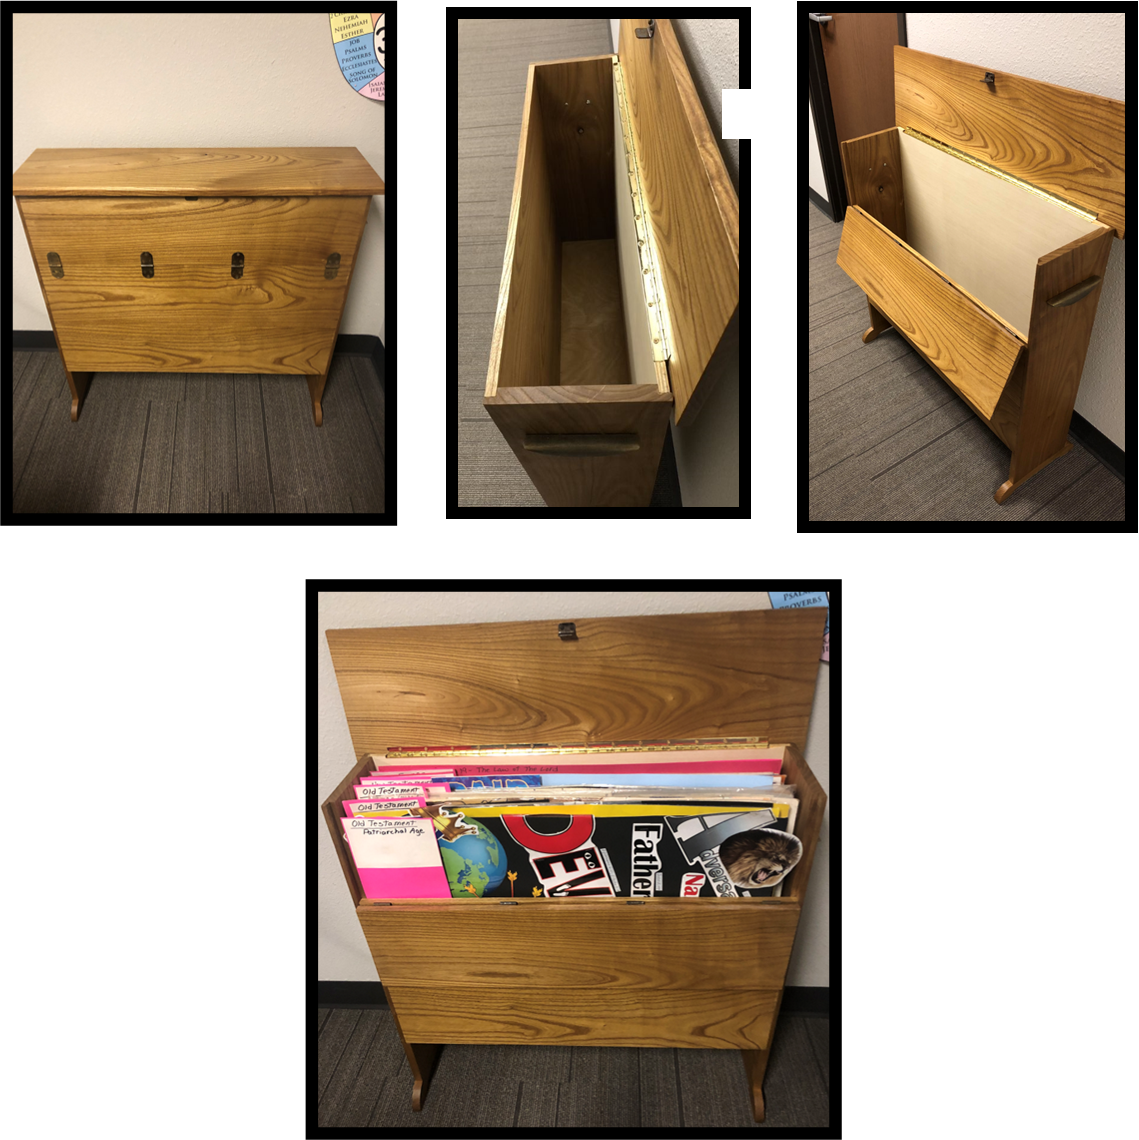
I had one man who, upon request, made our classroom a beautiful standing wooden case for poster storage. I organized the posters with labeled dividers for the case that only our class/age group would be using. It works wonderfully and all the teachers of our grade level love having these materials right at their fingertips! Thank you, Mr. Kevin!

Labeling the containers in your resource room is very important!
The Hang-ups clear bags we have for each of our Bible class picture categories are all labeled separately beginning with timelines, then pictures about the Bible, then Creation, etc. I sat with my computer in the resource room and made a list of all the categories of these pictures and then made colored coded labels. Each label below is for a separate bag and are color coded green – Babel – Joseph.
(There are more pictures after step 4 – Maintain, that will show you the zones/sections of the room and how items are labeled.)
Step 4 – Maintain
We do have rules in place as to what can or cannot leave the resource room.
- Our Hang-Ups, clear hanging bags for example, teachers may check out anything inside the bags, but the bags themselves must stay inside the resource rooms at all times.
- Laminator.
- Accucut machine and dies.
Meeting with the teachers is something you will want to do to explain the rules and flow of the room. You can easily set up a meeting with the teachers through your person who is over education if you have one.
We do have a printed legend for both of our resource rooms that lists each zone, and the categories within each zone. The teachers each have a copy of the Legend to keep, and a few are kept handy to use in the rooms.
We have one lady in charge of keeping our teaching supplies in stock when they begin to get low. She is also in charge of office supplies for the church and such.
As teachers use the resource room, we have a clipboard check out system with blanks for a person’s name, zone they took the item from, and the item they checked out. For each item they check out, they fill out a new line with their name, zone letter, and name of item. This system seems to work well for us, and it may for you.
It’s a great idea to have bags available for teachers to use to carry whatever they may have checked out. After they are finished with the item, they return the item(s) in the bag to the resource room in our labeled return bin.
The ladies who maintain this room do a weekly check as to what may have been returned and will put returned items away making sure the returned item(s) have been crossed off the checkout clipboard. If something has been checked out for over a quarter, one of these ladies will check if the item is still being used or if the person just forgot to turn it back in.
One of the final touches to our resource room was a sliding lock on the outside of the door which makes the room available to teachers to come and utilize the room when they have time in their schedules. The lock is high enough on the door to keep children from randomly entering without supervision.
Here is what our Resource room “A” looks like today with Zones A-H
Thanks for stopping by!

She is known to many as “Miss Gwen”.
She enjoys opening the Word of God with various ages, but children are one of her all-time favorites. Gwen has had the pleasure of putting the Word into the hearts of children for over 40 years and loves it still!
Gwen has been married to her preacher man Dan for over 45 years and knows the blessing of children with loving spouses and 5 sweet grandchildren who made her into Grandma & Nina.
Gwen is the author of the book, Mary Rose & Me Learn Bible Truths Together!
Mary Rose will help you love God, others, and yourself!
Check it out at the link below!
https://www.amazon.com/Mary-Rose-Me-Truths-Together/dp/1943245150
- Perk Up Your Kids’ Bible Class with Crowns, Hearts & Scrolls! - March 18, 2026
- Perk Up Your Kids’ Bible Class by Talking About the Bible Books! - August 21, 2024
- Perk Up Your Kids’ Bible Class with a Sweet Method for Resource Madness! - July 18, 2024
 Welcome! We are so glad you stopped by. Come Fill Your Cup is a group of Christian ladies dedicated to equipping women for study and service. We know you are busy and that life’s hectic pace pulls you in so many directions, but you can’t truly be the woman God desires unless you take time to fill your own cup…not with spa days (though we love a good spa!) or the latest novel…but with God’s Holy Word. We want to help you with that! Our goal is to reach you in the midst of your busy day and give you encouragement, education, and fellowship as you strive to live the life God has laid before you. Our prayer is that we can help fill your cup so that you, in turn, can overflow to all those around you. So, as we like to say…come fill your cup, and let it overflow!
Leave a Reply