1 Kings 11:26-40
Greetings! To my Sister Bible Class Teachers,
The weeks of 2022 are rolling by, and I can only imagine how many Bible class lessons are being prepared across the miles! Great job to all of you in putting the Word into so many young hearts! I pray many blessings come your way in this endeavor!
I wish I could peek into your classroom from time to time to see your class at work learning truths from God’s Word. I have always thought it would be a great help to set in each other’s classes to get new ideas and learn new techniques. I am always open to any sisters sitting in, especially if they are just starting out. It’s such a great way to train and encourage others.
Today I want to encourage you by sharing a fairly easy way to show that the Prophet Ahijah divided his coat into 12 pieces, which we know represented the 12 tribes of Israel. Can you imagine how Jeroboam felt being given 10 pieces of a new coat and being told he would be King over 10 tribes? I just wish he would have valued God and his commandments more than his fear. 1 Ki 12:25–33
Supplies: You will need 3 different contrasting colors of posters/paper of the same size (I used heavy paper like card stock, yellow for coat, blue for frame of coat, and orange for the back), pencil, white eraser (they work best), black sharpie marker, glue, scissors, and sticky Velcro.
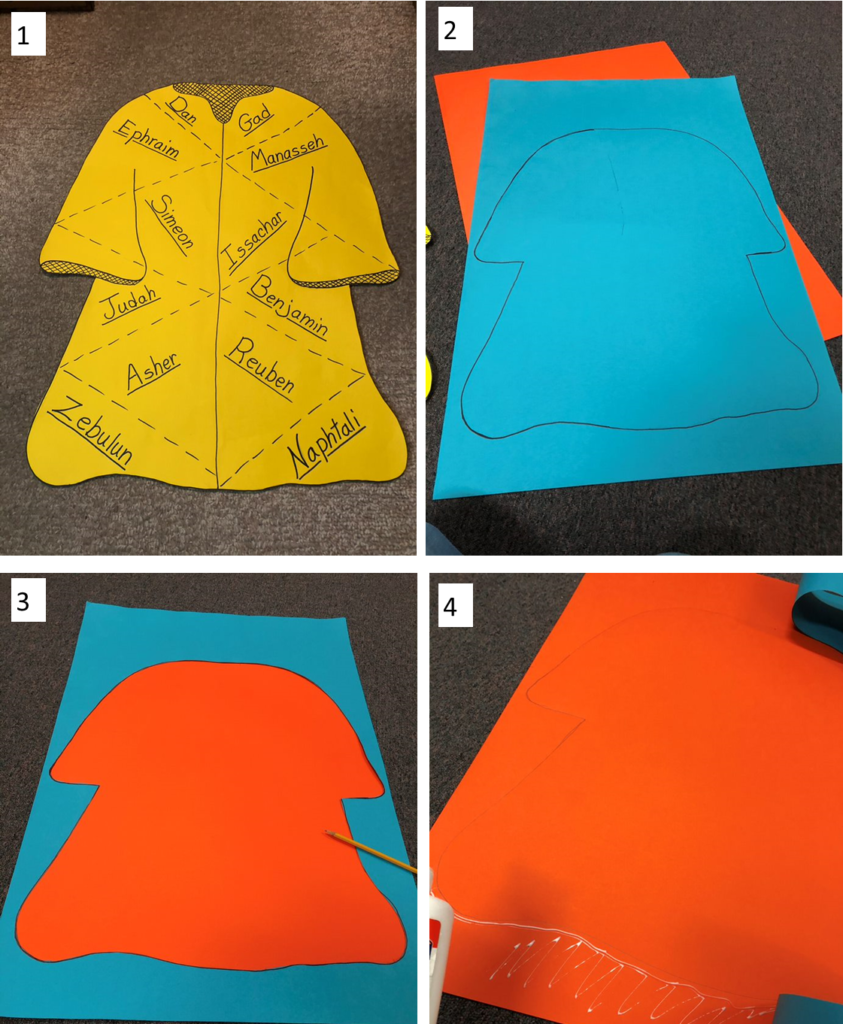
- Unless you want to fashion your own coat, you may want to print off the pictures below and use the yellow coat I made for an enlargement of Ahijah’s coat. An opaque projector is really nice for enlarging, and I do believe you could also use an overhead projector. This coat would also make a great take-home project. Just follow these instructions for a smaller coat and each student could have one to take home!
- Once you have the coat made, outline it onto one of the contrasting posters, (I used blue).
- Cut out the outline of the coat out of the blue. Lay the blue frame of the coat onto the orange poster which will be the back, making sure all edges are even. Use your pencil to draw the outline of blue coat frame onto the orange poster.
- Glue blue frame of coat to the orange back by lifting small sections of the blue frame, adding glue to orange poster staying outside the line of frame, and press frame down sticking to back or orange poster.
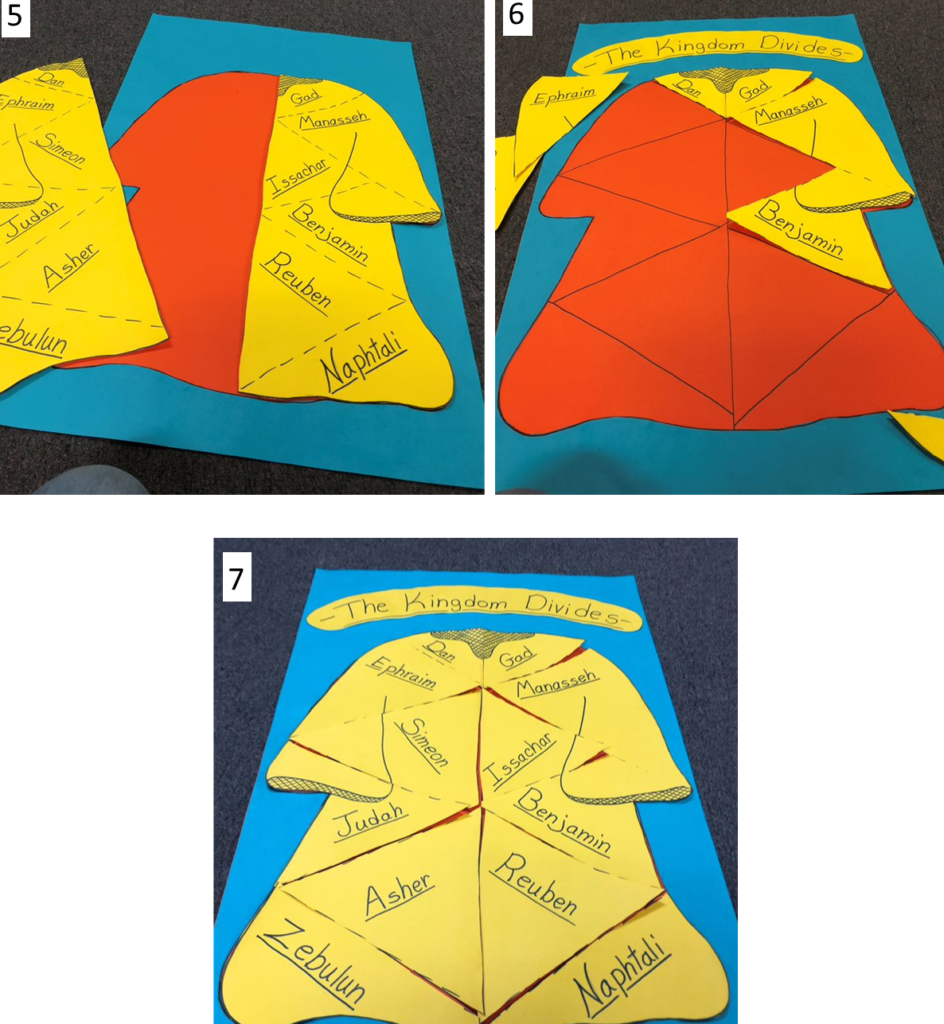
- Take the yellow coat and cut up the center line of the coat. Then cut each piece of the rest of the yellow coat following the dotted lines.
- Beginning with the top pieces of the coat, add the Velcro to one piece of the coat at a time, pressing the piece with the Velcro back down into the blue frame of the coat, onto the orange back. Once all the pieces are attached with Velcro, you may want to make a title for your poster. I used the yellow paper from making the coat and wrote – The Kingdom Divides –
Something else I did to help the students understand the concept of dividing, I had groups of many of different items on display, like a bowl of shells, a basket of pipe cleaners, a basket of rocks, a bowl of buttons, etc. There were about 10 – 15 different groups to divide and as the students arrived I had them divide the items from one group into two groups. I told them we were dividing groups and it would help us understand what we would be talking about in our Bible lesson.
Thanks for stopping by!
Your sister,
Gwen
- Perk Up Your Kids’ Bible Class by Talking About the Bible Books! - August 21, 2024
- Perk Up Your Kids’ Bible Class with a Sweet Method for Resource Madness! - July 18, 2024
- Perk Up Your Kids’ Bible Class by Feeding the “Big Mouth”, Books! - March 20, 2024


 Welcome! We are so glad you stopped by. Come Fill Your Cup is a group of Christian ladies dedicated to equipping women for study and service. We know you are busy and that life’s hectic pace pulls you in so many directions, but you can’t truly be the woman God desires unless you take time to fill your own cup…not with spa days (though we love a good spa!) or the latest novel…but with God’s Holy Word. We want to help you with that! Our goal is to reach you in the midst of your busy day and give you encouragement, education, and fellowship as you strive to live the life God has laid before you. Our prayer is that we can help fill your cup so that you, in turn, can overflow to all those around you. So, as we like to say…come fill your cup, and let it overflow!
Leave a Reply